You've placed an image on your slide, but it's hiding behind a text box — or covering something it shouldn't. Fixing the layer order in Google Slides takes a few clicks once you know where to look. This guide shows you exactly how to bring an image forward in Google Slides, send an image to the back, and manage the layer order of any element — plus how the same concept works in Google Docs.

- Right-click the image → Order → choose Bring to front, Bring forward, Send to back, or Send backward.
- Or use the menu: Arrange → Order → same four options.
- Below: step-by-step instructions with keyboard shortcuts, plus how to manage layers in Google Docs.
How Layers Work in Google Slides
Every element on a slide — images, text boxes, shapes, videos — sits on its own invisible layer. Elements added later sit on top of earlier ones. When two elements overlap, the one on the higher layer covers the one below. The "Order" commands let you rearrange these layers to control what appears in front of what.
There are four layer commands, and understanding the difference matters:
| Command | What it does |
|---|---|
| Bring to front | Moves the element to the very top layer — in front of everything else on the slide. |
| Bring forward | Moves the element up one layer — in front of the element directly above it. |
| Send to back | Moves the element to the very bottom layer — behind everything else on the slide. |
| Send backward | Moves the element down one layer — behind the element directly below it. |
How to Bring an Image Forward in Google Slides
Two ways to do it — both take a few seconds.
Method 1: Right-click
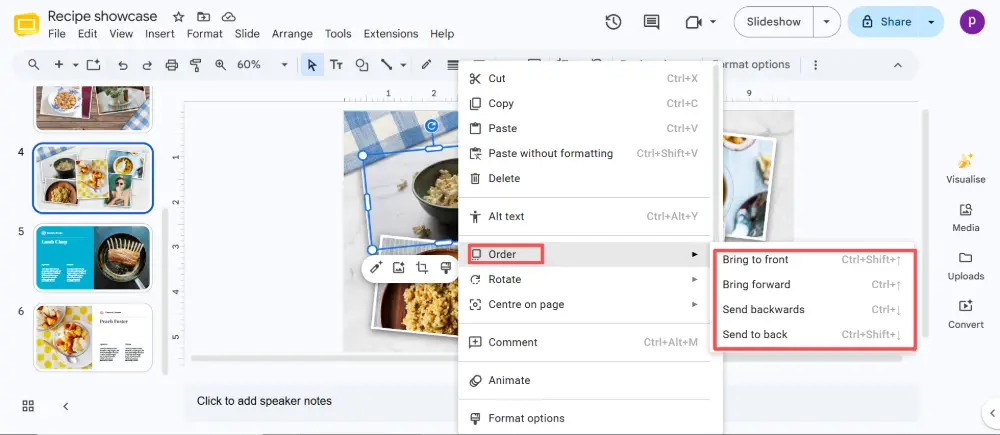
- Click on the image (or shape, text box, or any element) you want to move.
- Right-click on it.
- Hover over Order in the context menu.
- Choose Bring to front (all the way to the top) or Bring forward (up one layer).
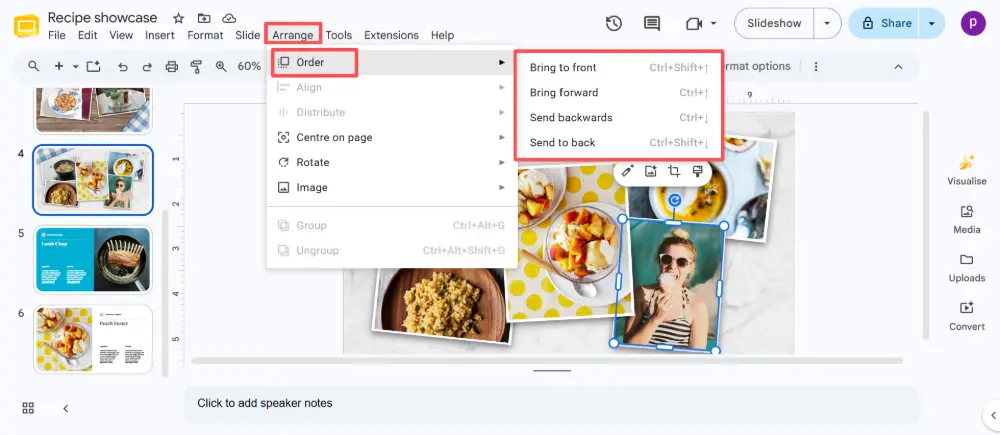
Method 2: Menu bar
- Click on the element you want to move.
- In the top menu, click Arrange.
- Hover over Order.
- Choose Bring to front or Bring forward.
How to Send an Image to the Back in Google Slides
The reverse works the same way:
- Click on the image you want to move behind other elements.
- Right-click → Order → Send to back (all the way behind) or Send backward (down one layer).
- Or use Arrange → Order → same options.
Keyboard Shortcuts
| Action | Windows / Chromebook | Mac |
|---|---|---|
| Bring to front | Ctrl + Shift + ↑ | Cmd + Shift + ↑ |
| Bring forward | Ctrl + ↑ | Cmd + ↑ |
| Send to back | Ctrl + Shift + ↓ | Cmd + Shift + ↓ |
| Send backward | Ctrl + ↓ | Cmd + ↓ |
If the element you need to select is completely hidden behind another, try pressing Tab to cycle through all elements on the slide. Each press selects the next element in layer order, letting you reach hidden items without moving anything first.
How to Bring a Photo Forward in Google Docs
Google Docs handles images differently from Google Slides because text flows around images. To control layering in Docs:
- Click on the image.
- Click the small Image options icon that appears (or right-click → Image options).
- Under Text wrapping, choose "In front of text" or "Behind text" to control whether the image sits above or below text.
- If you have two overlapping images (both set to "In front of text"), right-click → Order → Bring to front / Send to back, just like in Slides.
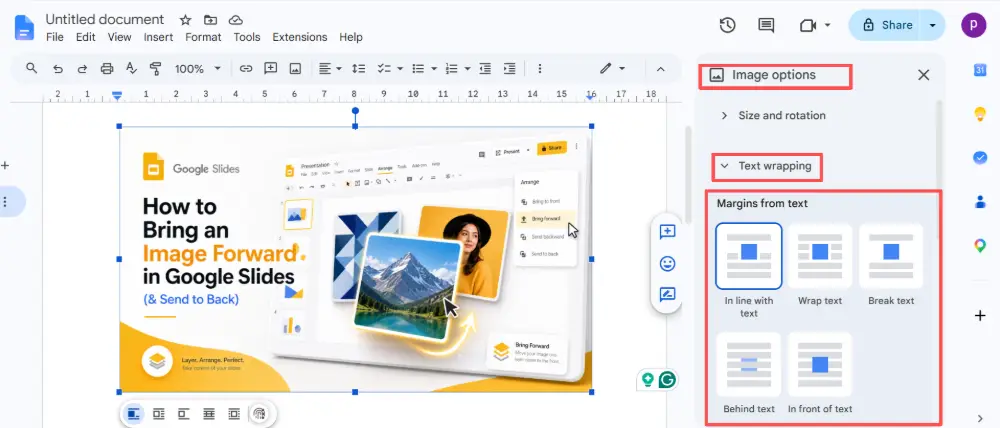
The key difference: in Docs, images are "Inline" by default (they move with text). You need to change the wrapping to "In front of text" or "Behind text" before the Order commands become available.
Common Issues and Fixes
| Problem | Fix |
|---|---|
| Can't select an image hidden behind another | Press Tab to cycle through all elements, or temporarily move the top element aside. |
| "Order" option is grayed out | Make sure you've clicked directly on the element (not the slide background). In Docs, change text wrapping to "In front of text" first. |
| Image keeps snapping to the wrong position | Disable snap-to-grid: View → uncheck "Snap to grid" (Slides) for finer control. |
| Want to lock an element in place | There's no native lock in Google Slides. Workaround: place the element on the slide master (Slide → Edit theme) so it can't be accidentally moved on regular slides. |
💡 Pro tip: If you're spending too much time arranging layers and formatting slides manually, try an AI presentation tool like Gamma.com.ai. It handles layout and layering automatically, so images, text, and shapes are always properly arranged without manual adjustments.
Conclusion
Bringing an image forward or sending it to the back in Google Slides takes one right-click: Order → Bring to front / Send to back. Use "Bring forward" and "Send backward" for one-layer-at-a-time control, or the keyboard shortcuts for speed. In Google Docs, change the image's text wrapping to "In front of text" first, then use the same Order commands. And if an element is hidden, press Tab to cycle through layers and find it.
FAQs
How do I bring an image to the front in Google Slides?
Click the image, then right-click → Order → Bring to front. Or use the menu: Arrange → Order → Bring to front. The keyboard shortcut is Ctrl+Shift+↑ (Cmd+Shift+↑ on Mac).
How do I send an image to the back in Google Slides?
Click the image, right-click → Order → Send to back. Or Arrange → Order → Send to back. Shortcut: Ctrl+Shift+↓ (Cmd+Shift+↓ on Mac). Use "Send backward" instead to move it just one layer down.
How do I bring a photo forward in Google Docs?
First, change the image's text wrapping to "In front of text" (click the image → Image options → Text wrapping). Then right-click → Order → Bring to front. The Order commands only work in Docs when the image is set to "In front of text" or "Behind text."
How do I select an element hidden behind another?
Press Tab to cycle through all elements on the slide in layer order. Each press selects the next element, letting you reach hidden items. Alternatively, temporarily move the top element aside, select the hidden one, then move it back.
What's the difference between "Bring to front" and "Bring forward"?
"Bring to front" moves the element all the way to the top — in front of everything. "Bring forward" moves it up just one layer. Use "Bring forward" for precise control when you have multiple overlapping elements and want a specific stacking order.